The Appeal of Metallic Venetian Plaster
Metallic Venetian plaster is a luxurious and visually striking finish that adds a unique, reflective quality to walls and ceilings. This type of plaster incorporates metallic pigments, creating a shimmering effect that catches and reflects light beautifully. The result is a sophisticated, elegant surface that can transform any space, making it look more dynamic and upscale. Metallic Venetian plaster is perfect for feature walls, commercial spaces, and any area where you want to make a bold design statement.
Unique Qualities and Visual Effects
Metallic Venetian plaster offers several unique qualities and visual effects that set it apart from traditional plaster finishes. The incorporation of metallic pigments provides a subtle yet impactful sheen that changes with the lighting and angle of view. This reflective quality can make spaces appear larger and more vibrant, adding depth and dimension to flat surfaces. Additionally, the versatility of metallic Venetian plaster allows for various application techniques, enabling the creation of custom textures and finishes that enhance the overall aesthetic of a room.
Preparation
Surface Preparation
Cleaning
Before applying metallic Venetian plaster, it’s crucial to ensure that the surface is thoroughly cleaned. Any dust, grease, or debris can interfere with the adhesion and finish of the plaster.
- Steps for Cleaning the Surface:
- Dust Removal: Use a dry cloth or vacuum cleaner to remove dust from the surface.
- Grease and Grime: Clean the surface with a mild detergent solution to remove any grease or grime. Rinse with clean water and allow it to dry completely.
- Final Wipe: Wipe the surface with a damp cloth to ensure it is spotless.
Patching and Repairing
Any imperfections on the surface, such as cracks or holes, need to be patched and repaired before applying the plaster. This step ensures a smooth base, which is essential for a flawless finish.
- Steps for Patching and Repairing:
- Identify Imperfections: Inspect the surface for any cracks, holes, or uneven areas.
- Fill and Smooth: Use a suitable patching compound to fill in any imperfections. Smooth the compound with a putty knife and allow it to dry.
- Sanding: Once the compound is dry, sand the surface lightly to create a smooth, even base.
Priming
Priming the surface is essential to enhance the adhesion of the metallic Venetian plaster and ensure an even application.
- Steps for Priming the Surface:
- Choose the Right Primer: Select a primer that is compatible with both the base surface and the metallic plaster.
- Apply Evenly: Use a brush or roller to apply the primer in an even coat. Ensure full coverage and avoid leaving any bare spots.
- Drying Time: Allow the primer to dry completely according to the manufacturer’s instructions before proceeding with the plaster application.
Material Selection
Choosing Metallic Plaster
Selecting the right type of metallic Venetian plaster is crucial for achieving the desired finish. Various options are available, each offering different metallic effects and properties.
- Factors to Consider:
- Finish: Determine the desired finish (e.g., high-gloss, satin, or matte) and choose a plaster that provides that effect.
- Colour: Select the appropriate metallic colour, such as silver, gold, bronze, or custom blends.
- Compatibility: Ensure the metallic plaster is compatible with the base surface and any primers used.
Pigments and Additives
Understanding the role of metallic pigments and other additives can help you achieve the desired visual effect and performance.
- Types of Pigments:
- Metallic Pigments: These provide the reflective, shimmering quality of the plaster.
- Additives: Other additives, such as binders and stabilisers, can enhance the plaster’s durability and workability.
- Mixing: Carefully follow the manufacturer’s instructions for mixing pigments and additives to ensure a consistent and uniform colour and texture.
Tools and Equipment
Essential Tools
Using the right tools is critical for the successful application of metallic Venetian plaster.
- Trowels: Stainless steel trowels with smooth edges are ideal for applying and smoothing the plaster.
- Spatulas: Useful for detailed work and smaller areas.
- Brushes: Needed for priming and sometimes for creating specific textures.
- Mixing Tools: A mechanical mixer or paddle mixer attached to a drill ensures thorough blending of the plaster and pigments.
Protective Gear
Safety is important when working with metallic pigments and plaster. Wearing appropriate protective gear helps protect your skin, eyes, and respiratory system.
- Gloves: Protect your hands from irritation and chemical exposure.
- Masks: Use a mask to avoid inhaling dust and fumes from the plaster and pigments.
- Safety Glasses: Protect your eyes from splashes and airborne particles.
By carefully preparing the surface, selecting the right materials, and using appropriate tools and protective gear, you can ensure a successful application of metallic Venetian plaster, setting the stage for a stunning and durable finish.
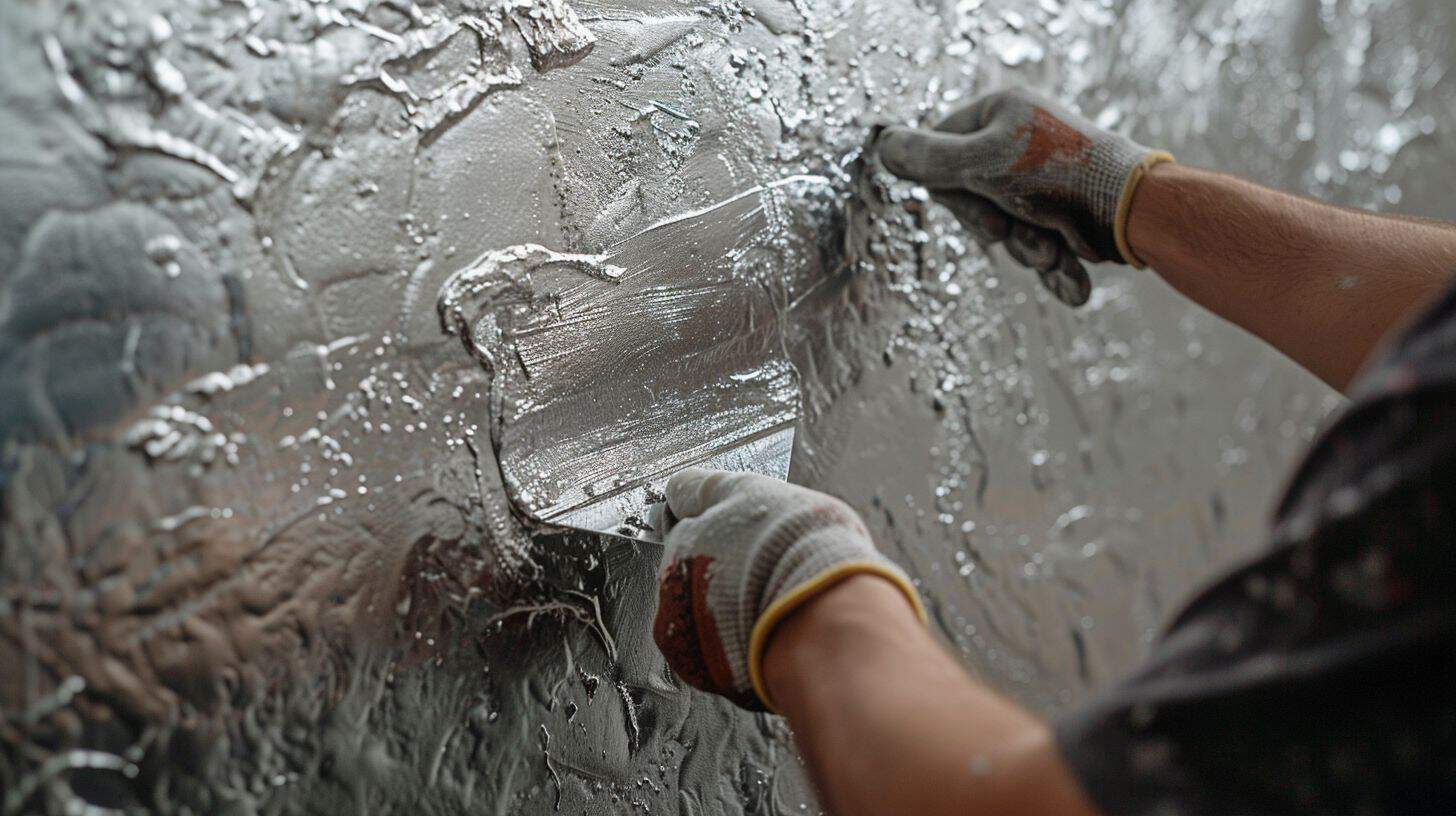
Layering Techniques
Base Layer Application
First Layer
The first layer of metallic Venetian plaster serves as the foundation for the subsequent layers. It’s crucial to apply this layer evenly to create a smooth base for building up the metallic effect.
- Applying the Initial Layer of Metallic Plaster:
- Mix Thoroughly: Ensure the plaster and metallic pigments are well mixed before application.
- Load the Trowel: Scoop a small amount of plaster onto your trowel.
- Apply Evenly: Starting at the top of the wall, apply the plaster in smooth, overlapping strokes. Maintain a consistent thickness across the surface.
- Smooth the Surface: Use the flat edge of the trowel to smooth out any ridges or bumps, ensuring an even layer.
Techniques
Proper techniques are essential for achieving a smooth and uniform base layer.
- Ensuring Even Coverage and Smoothness:
- Consistent Pressure: Apply consistent pressure to avoid streaks and uneven areas.
- Overlapping Strokes: Use overlapping strokes to blend the plaster seamlessly.
- Feather Edges: Feather the edges of each stroke to prevent visible lines or transitions.
Drying Time
Allowing sufficient drying time is crucial before applying additional layers to ensure each layer sets properly and adheres well.
- Allowing Sufficient Drying Time Before Additional Layers:
- Check Manufacturer’s Instructions: Follow the recommended drying times provided by the plaster manufacturer.
- Environmental Factors: Consider temperature and humidity, as these can affect drying times. Ensure good ventilation to promote even drying.
Intermediate Layers
Building Up Layers
Applying intermediate layers helps to enhance the depth and richness of the metallic finish. Each layer adds more dimension and complexity to the final appearance.
- Applying Intermediate Layers to Enhance Depth and Richness:
- Repeat the Application Process: Apply each layer in the same manner as the first, ensuring even coverage and smoothness.
- Gradual Build-Up: Gradually build up the layers to achieve the desired depth and intensity of the metallic effect.
Techniques
Using consistent techniques is key to maintaining uniformity across all layers.
- Using Consistent Strokes and Pressure for Uniformity:
- Maintain Consistency: Keep your strokes and pressure consistent to avoid variations in texture and thickness.
- Blend Seamlessly: Ensure each layer blends seamlessly into the previous one for a cohesive finish.
Drying Between Layers
Ensuring each layer is fully dry before applying the next is essential to prevent issues such as cracking or poor adhesion.
- Ensuring Each Layer is Fully Dry Before Applying the Next:
- Follow Drying Times: Adhere to the recommended drying times between layers.
- Test for Dryness: Lightly touch the surface to check for dryness before proceeding with the next layer.
Final Layer
Achieving the Desired Finish
The final layer is where you perfect the metallic effect and ensure the surface is smooth and reflective.
- Techniques for a Smooth, Reflective Final Layer:
- Smooth Application: Apply the final layer with smooth, even strokes to achieve a flawless finish.
- Feather Edges: Carefully feather the edges to blend the plaster seamlessly.
Burnishing
Burnishing the final layer enhances the metallic effect, adding a high-gloss, reflective quality to the finish.
- Polishing the Final Layer to Enhance the Metallic Effect:
- Initial Burnishing: While the plaster is still slightly damp, use a clean, stainless steel trowel to gently burnish the surface in circular motions.
- Final Burnishing: Once the plaster is fully dry, apply firmer pressure with the trowel or a polishing stone to achieve a high-gloss finish.
Drying and Curing
Allowing the plaster to fully cure ensures maximum durability and longevity of the finish.
- Allowing the Plaster to Fully Cure for Maximum Durability:
- Follow Manufacturer’s Instructions: Adhere to the recommended curing times provided by the plaster manufacturer.
- Optimal Conditions: Ensure the room has stable temperature and humidity levels to promote proper curing.
By following these layering techniques, you can achieve a stunning and durable metallic Venetian plaster finish that adds depth, richness, and a reflective quality to any space.
Achieving Uniform Effects
Techniques for Even Application
Consistent Pressure
Maintaining consistent pressure during the application of metallic Venetian plaster is essential to avoid streaks and patches. Uneven pressure can lead to visible lines and uneven textures.
- Maintaining Even Pressure to Avoid Streaks and Patches:
- Practice Control: Use controlled, steady movements with your trowel.
- Monitor Pressure: Regularly check and adjust the pressure to ensure it remains consistent across the entire surface.
Smooth Strokes
Using smooth, overlapping strokes helps to create a uniform finish. This technique ensures that each section of plaster blends seamlessly with the next.
- Using Smooth, Overlapping Strokes for Uniform Coverage:
- Technique: Apply the plaster in long, smooth strokes, overlapping slightly with each pass.
- Blending: Feather the edges of each stroke to blend seamlessly into adjacent areas.
Feathering Edges
Feathering the edges of each plaster layer prevents visible lines where sections overlap, ensuring a cohesive and polished finish.
- Blending Edges to Avoid Visible Lines:
- Light Pressure: Apply light pressure as you feather the edges to blend them smoothly.
- Overlap Strokes: Overlap your strokes slightly to blend the edges seamlessly.

Handling Metallic Pigments
Mixing
Ensuring that metallic pigments are evenly distributed throughout the plaster is crucial for a uniform finish. Proper mixing techniques prevent clumping and uneven colour.
- Ensuring Even Distribution of Metallic Pigments:
- Thorough Mixing: Use a mechanical mixer or paddle mixer to blend the pigments thoroughly into the plaster.
- Check Consistency: Ensure the mixture is smooth and uniform before application.
Preventing Separation
Metallic pigments can sometimes separate from the plaster during mixing and application. Techniques to prevent this help maintain an even finish.
- Techniques to Keep Pigments from Separating During Application:
- Regular Stirring: Stir the plaster mixture periodically during application to keep the pigments evenly distributed.
- Consistent Mixing: Ensure the pigments are well mixed before starting the application process.
Maintaining Consistency
Maintaining the consistency of the plaster mixture is essential for achieving a uniform finish. Regularly stirring the mixture helps keep the pigments and plaster evenly combined.
- Regularly Stirring the Mixture to Maintain Uniformity:
- Periodic Stirring: Stir the plaster mixture every 10-15 minutes during application to prevent settling.
- Check Consistency: Regularly check the consistency of the mixture to ensure it remains uniform.
Tips for Enhancing Metallic Effects
Lighting Considerations
Lighting plays a significant role in highlighting the metallic effects of Venetian plaster. Proper lighting can enhance the reflective quality and overall impact of the finish.
- How Lighting Affects the Appearance of Metallic Plaster:
- Natural Light: Utilize natural light to enhance the shimmer and depth of the metallic finish.
- Artificial Lighting: Use spotlights or ambient lighting to highlight specific areas and create dynamic effects.
Layering for Depth
Applying multiple layers of metallic plaster can create a sense of depth and complexity, enhancing the overall visual impact.
- Using Multiple Layers to Create Depth and Complexity:
- Build Gradually: Apply several thin layers, allowing each to dry completely before adding the next.
- Vary Pigments: Consider varying the metallic pigments slightly between layers to add subtle variations in colour and depth.
Polishing Techniques
Polishing and burnishing the final layer of metallic plaster enhances its reflective qualities, adding a high-gloss, mirror-like finish.
- Enhancing the Metallic Sheen Through Polishing and Burnishing:
- Initial Polishing: Use a clean, stainless steel trowel to gently polish the surface while it is still slightly damp.
- Final Burnishing: After the plaster is fully dry, apply firm pressure with the trowel or a polishing stone to achieve a high-gloss finish.
By following these techniques and tips, you can achieve a uniform and visually stunning metallic Venetian plaster finish that adds depth, richness, and a reflective quality to any space.
Conclusion
Recap of Key Steps in Preparing and Applying Metallic Venetian Plaster
Applying metallic Venetian plaster involves several critical steps to achieve a stunning, uniform finish. Proper surface preparation, including cleaning, patching, and priming, sets the foundation for successful application. Selecting the right materials, such as high-quality metallic plaster and appropriate pigments, ensures the best results. Using the correct tools and protective gear is essential for both safety and efficiency.
Layering techniques play a crucial role in building depth and richness. Starting with a well-applied base layer, followed by carefully applied intermediate layers, and finishing with a smooth, polished final layer, creates a professional-grade finish. Consistent pressure, smooth strokes, and feathering edges are key to achieving uniformity. Regular stirring and proper mixing of metallic pigments prevent separation and ensure even distribution.
Summary of Techniques for Achieving Uniform, Reflective Finishes
- Surface Preparation: Clean, patch, and prime the surface meticulously to create a smooth base.
- Material Selection: Choose high-quality metallic plaster and pigments suitable for the desired finish.
- Layering Techniques: Apply multiple thin layers, allowing each to dry completely, and use consistent pressure and smooth strokes.
- Mixing and Handling Pigments: Thoroughly mix pigments into the plaster and stir regularly during application to maintain consistency.
- Polishing and Burnishing: Enhance the metallic sheen with proper polishing and burnishing techniques.
Final Thoughts on the Benefits and Aesthetic Impact of Metallic Venetian Plaster
Metallic Venetian plaster offers a unique and luxurious finish that enhances the aesthetic appeal of any space. Its reflective qualities and depth create a dynamic visual effect that changes with lighting and perspective. This sophisticated finish is perfect for adding elegance and character to feature walls, commercial spaces, and high-end interiors. By mastering the techniques for applying and polishing metallic Venetian plaster, you can achieve stunning results that elevate the overall design and atmosphere of a room.
Metallic Venetian Plaster Services by Venetian Plasterer in Sydney
At Venetian Plasterer, we specialise in applying metallic Venetian plaster to create breathtaking finishes that add depth and sophistication to any space. Providing professional Venetian plastering services across Sydney, our skilled artisans meticulously handle each step of the process, from surface preparation to final polishing. Trust our Sydney Venetian plaster team for all your Venetian plaster needs in Sydney, and experience the transformative power of metallic finishes that enhance the beauty and elegance of your interiors.
Related